Setting up a Raspbian Raspberry Pi from OSX (+bfgminer)
Learn how to set up Raspbian on a Raspberry Pi - all steps taken on an OSX 10.8.5 laptop. Then, few extra steps to compile bfgminer.
I'll wager that it'll be pretty solid for our nerd cred to claim we've run a [bitcoin] miner in our day; who knows, they may even be worth something serious in the near future. I wouldn't call myself a Bitcoin advocate, but, do see some appeal in being part of something "cool" that might just pay off.
Part of paying off, is keeping the spend low. Raspberry Pis make a ton of sense as controllers when you consider electricity cost. Second, you'll probably be pairing it up with ASICs, so the Raspberry itself doesn't need much CPU. Lastly Raspberry Pis are cheap.
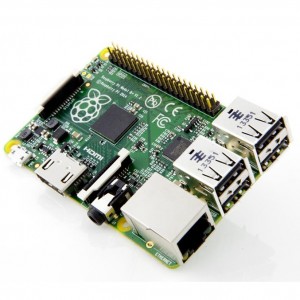
Raspberry Pi's B+ model works great as an ASIC controller
The Pi itself can't mine much coin though, its job is only that of muscling requests between your mint of choice and your ASICs (people did used to mine with GPUs, but with the processing that ASICs can now perform, I can't see GPU's being viable anymore). Some great entry-level ASICs are the Butterfly Jalapeño and the Rockminer R-BOX. Don't pay retail! Get them from folks on ebay who are selling them cheap because they couldn't figure it out!
Setting Up Your Raspberry Pi
For this first part, you won't even need the Raspberry itself. The RPi uses a micro SDHC card as hard drive, and the biggest part of the job is simply that of prepping it before you stick it into the RPi and boot.
- Download Raspbian from this link
- While that's downloading, nab SD Formatter from here
- Once downloaded, install - and then insert your SDHC card into your Mac
- Launch SD Formatter and execute a quick format on your SDHC card - quick should suffice
- Raspbian downloaded, unpack the zip so that the .img file is ready
- Fire up Terminal, and run diskutil list
- Note the SDHC card's IDENTIFIER in the output (mine was disk1s1)
- Unmount the SDHC card with diskutil unmount (drive). My command was diskutil unmount /dev/disk1s1
- Still in Terminal, in the folder where you unpacked the raspbian zip, execute the dd command with sudo, modifying the disk name a little bit: prefix it with 'r', and remove the subpart. For example, disk1s1 becomes rdisk1. As second example disk2s1 would become rdisk2. Adjusting the disk and img name to reflect your situation, command to run looks like: sudo dd bs=1M if=2014-09-09-wheezy-raspbian.img of=/dev/rdisk1
- Go make a sandwich, this takes awhile. You can hit CTRL+T to get a status update while dd runs.
- When this process is complete, put the SDHC card in your RPi, connect a keyboard and screen to it, and boot it up.
- Your first boot will take you through raspi-config. I recommend that you activate SSH so that you can park this near your miners, wire everything up (miners, plug into Ethernet, etc.) and finish from your couch over wifi.
Setting Up Bfgminer
I've tried a few, the Bitminter client, cgminer, and bfgminer. Bfgminer felt most solid; setting it up takes awhile on the RPi, but is well worthwhile
First, make sure that your RPi is all patched up with:
- sudo apt-get update
- sudo apt-get upgrade
Then, install the small libs we'll need with:
- sudo apt-get install libusb-1.0-0-dev libusb-1.0-0 libcurl4-openssl-dev libncurses5-dev libudev-dev build-essential debhelper autoconf automake libtool libssl-dev yasm pkg-config wget unzip libjansson-dev git quilt uthash-dev screen
You'll need to give bfgminer a home, I set mine up in /home/bitcoin. The commands to execute are:
- git clone git://github.com/luke-jr/bfgminer.git
- cd /bfgminer
- sudo ./autogen.sh
- CFLAGS="-O2 -Wall -march=native" sudo ./configure --enable-icarus --enable-bflsc
- sudo make
The sum of these commands will take awhile. The little RPi isn't the fastest compiler -- but the result is well worth it! You're nearly done! The --enable-icarus directive is what lets your bfgminer support Rockminers. Similarly, the --enable-bflsc lends Butterfly support to the build.
Once the compilation is complete, you can start your bfgminer with:
bfgminer /home/bitcoin/bfgminer -o pool -O user:password -S all
For example, I mine with bitminter - the launch command looks like:
bfgminer /home/bitcoin/bfgminer -o stratum+tcp://mint.bitminter.com:3333 -O Username_worker:password -S all
Remember to set up your worker ahead of time!
To run the command in screen, it'd look like:
sudo -u pi /usr/bin/screen -d -m -S bfgminer /home/bitcoin/bfgminer -o stratum+tcp://mint.bitminter.com:3333 -O Username_worker:password -S all &
By the way, the word password in the samples above, is really just 'password' if you are using bitminter where password isn't used.
This truly concludes things! You should be on the road to riches now! Let me know if this post helped!
List all of your Basecamp Classic files & attachments
Less of a blog, and more of a utility post - if you have PHP and want to find out what's eating up your Basecamp file-space allocation, this little script might help you.
Insert your API token in the right spot, insert your email in the user agent, and execute from the command line.
function fetch( $uri )
{
    /* Adjust these three variables */

    //  1 - your Basecamp URL
    $basecamp_url   = 'https://yourbasecamp.basecamphq.com/';

    // 2 - get this from your "Account" section
    $username       = 'YOURAPITOKEN';

    // 3 - enter your main account email, or face potential throttling
    $youremail      = 'youremail@youremail.com';


    $password       = 'notused';
    $session        = curl_init();

    curl_setopt($session, CURLOPT_URL, $basecamp_url . $uri );
    curl_setopt($session, CURLOPT_HTTPAUTH, CURLAUTH_BASIC);
    curl_setopt($session, CURLOPT_HTTPGET, 1);
    curl_setopt($session, CURLOPT_HEADER, false);
    curl_setopt($session, CURLOPT_HTTPHEADER, array('Accept: application/xml', 'Content-Type: application/xml'));
    curl_setopt($session, CURLOPT_RETURNTRANSFER, true);
    curl_setopt($session, CURLOPT_USERPWD, $username . ":" . $password);
    curl_setopt($session, CURLOPT_SSL_VERIFYPEER, false);
    curl_setopt($session, CURLOPT_USERAGENT, "Circlical Account Maintenance ($youremail)" );

    $response = curl_exec($session);
    curl_close($session);

    return $response;
}

function fffsize( $size )
{
    $base   = @log($size) / log(1024);
    $suffix = array("", "k", "M", "G", "T")[@floor($base)];
    return @round( pow(1024, $base - @floor($base)), 2 ) . $suffix;
}

function info( $str )
{
    echo "\033[01;36m" . $str  . " \033[0m\n";
}

$attachment_list    = [];
$projects           = simplexml_load_string( fetch( 'projects.xml' ) );

foreach( $projects as $p )
{

    $project_name   = $p->name;
    $project_id     = $p->id;
    $ncount         = 0;

    info( "Scanning project $project_name..." );

    do{
        $attachments = simplexml_load_string( fetch( "projects/{$project_id}/attachments.xml?n={$ncount}" ) );
        if( count( $attachments->attachment ) )
        {
            foreach( $attachments as $a )
            {
                $attachment_list[] = array(
                    'project'   => (string)$project_name,
                    'file'      => (string)$a->name,
                    'size'      => (string)$a->{'byte-size'},
                );

                $ncount++;
            }
        }
    }
    while( count( $attachments->attachment ) >= 100 );
}

// now sort the darned attachments
usort( $attachment_list, function( $a, $b ){
    return $b['size'] - $a['size'];
});

$mask = "| %-20.20s | %-30.30s | %15.15s |\n";


echo printf( $mask, "Project", "File", "Size" );

foreach( $attachment_list as $a )
{
    echo printf( $mask, $a['project'], $a['file'], fffsize( $a['size'] ) );
}
Pretty print your ZF2 JsonModel the easy way
Looking for a quick cut and paste, I found crazy composer modules and overcomplicated blog articles. Thought I'd help Occam out a bit with this very simple blog entry! BTW I lied, we're going to skip JsonModel.
Sorry for the crappy indentation, trying to make it fit in Squarespace. JSON_PRETTY_PRINT came along with PHP 5.4
        public function prettyJsonAction()
        {
            $contacts = array( 'foo' => 'bar' );
            $response = $this->getResponse();

            $response
                ->getHeaders()
                ->addHeaderLine( 'Content-Type', 'application/json' );

            $response
                ->setContent(
                    json_encode( $contacts, JSON_PRETTY_PRINT )
                );

            return $response;
        }
Getting Zend Framework 2 and Google's API to play nice
Need to use Google's API from your ZF2 app? Tired of parsing through StackOverflow and Google's multiple document versions? You're in the right place. In my particular case, I needed to connect to Google's calendar service. Examples below.
Setup - ZF2
We're going to make use of the google/apiclient composer package for all of this. Edit your composer.json and add "google/apiclient": "1.0.*@dev"
You're also going to need an oAuth callback route. When your app authenticates with Google, it sends a passback token that the Google client uses to generate an auth token. For now, create a route in a module of your choice, that leads to a controller that contains 'callbackAction'. I called mine GoogleController, you'll see its code below.
Setup - Google
Most of the confusion that was evidenced, exists at this step. There's a new UI rolled out, the docs don't match, and the names of the keys referenced in the docs are a function of these visuals. Head over to https://console.developers.google.com/, and access the Project you would like to connect (create one if required).
Under APIS & AUTH on the left hand side, select APIs. Here, "turn on" all of the "features" that your program needs.
Next, under Credentials, click on the Create a new Client ID button. This will show you a modal window, where you have several options. Select Web Application, and fill out the text boxes at the bottom (with your App's URLs). Pay special attention to the second, that's the redirect URI whose callback route you configured earlier (callbackAction). Click Create Client ID, and you're done.
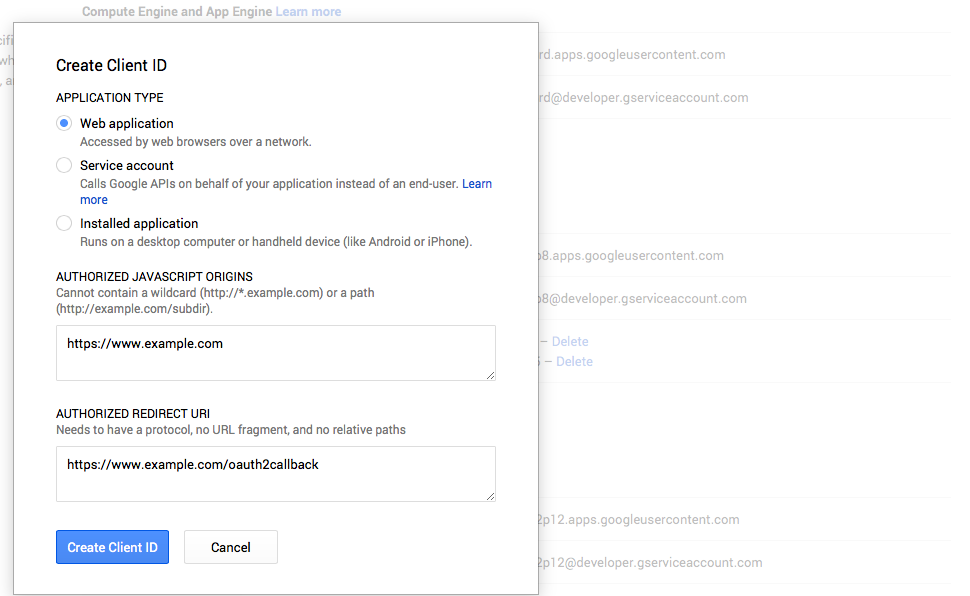
Screenshot of the Create Client ID panel
Next, under Public API access at the bottom left, click on Create new Key. This opens another small modal, where you will click on Server key. A last panel appears which asks you which IP addresses you want to whitelist. Type them in, and close the modal. This created a table in the main view with API KEY. This is commonly called Developer Key in the apps.
Gather all the details...
You can pretty much fill in this worksheet at this stage, we'll reference it in the code that follows:
- DEVELOPER_KEY: "Key for server applications" > "API KEY"
- CLIENT_ID: "Client ID for web application" > "CLIENT ID"
- CLIENT_SECRET: "Client ID for web application" > "CLIENT SECRET"
- CALLBACK: The callback URI you defined
Into Zend Framework...
The Google API that you installed with composer (you ran your php composer.phar selfupdate and php composer.phar update right?) really is a throwback to old university assignments. The profs would come up with the most horrendous combinations of words and underscores. We're going to hide that ugliness away in your main Module. Create a factory in your getServiceConfig() that looks like:
'GoogleClient' => function( $sm ){
    $client = new \Google_Client();
    $client->setAccessType('online');
    $client->setApplicationName('doesnotmatter');
    $client->setClientId( CLIENT_ID );
    $client->setClientSecret( CLIENT_SECRET );
    $client->setRedirectUri( CALLBACK );
    $client->setDeveloperKey( DEVELOPER_KEY );
    return $client;
},
This is the client we'll use to establish "scope", which is critical to your usage of the API. In my case, I wanted to schedule a Calendar event via AJAX. I added a second factory for GoogleCalendar, like so:
'GoogleCalendar' => function( $sm ){
    $client = $sm->get('GoogleClient');
    $client->setScopes( array(
        'https://www.googleapis.com/auth/calendar'
    ));

    if( isset( $_SESSION['google_access_token'] ) )
        $client->setAccessToken( $_SESSION['google_access_token'] );

    if( !$client->getAccessToken() )
        return new \Application\Model\Google\AuthRequest( $client->createAuthUrl() );

    $calendar = new \Google_Service_Calendar( $client );
    return $calendar;
}
The clever you notices an interjected AuthRequest class to signal that the app (at that point in time) had no rights to adjust calendars. It's a vehicle class, that exists since factories must return objects, it also cleans up the Controller code. Here's my AuthRequest class, you can do this any way you need:
namespace Application\Model\Google;

class AuthRequest
{

    public $auth_url;


    public function __construct( $url )
    {
        $this->auth_url = $url;
    }

    /**
     * @param mixed $auth_url
     */
    public function setAuthUrl($auth_url)
    {
        $this->auth_url = $auth_url;
    }

    /**
     * @return mixed
     */
    public function getAuthUrl()
    {
        return $this->auth_url;
    }

}
ZF2 Application Flow
- A modal window appears in my front end, which sends an AJAX request to a controller
- The controller munges the data received, and tries to schedule the calendar events
- It's possible that an oAuth dialog needs to be shown, handle it.
- Conversely, possible that oAuth is already taken care of, schedule the events
Controller Action
function scheduleEvent
{
    // app-specific data processing

    try
    {
    $calendar = $this->getServiceLocator()->get('GoogleCalendar');

     if( $calendar instanceof AuthRequest )
         return new JsonModel( array( 'oauth' => true, 'url' => $calendar->getAuthUrl() ) );

     /** @var \Google_Service_Calendar $calendar */
     $event = new \Google_Service_Calendar_Event();
     $event->setSummary( "This is a test" );
     $dts = new \Google_Service_Calendar_EventDateTime();
     $dts->setDateTime( date( "Y-m-d\\TH:i:s.000-04:00" ) );
     $event->setStart( $dts );

     $dte = new \Google_Service_Calendar_EventDateTime();
     $dte->setDateTime( date( "Y-m-d\\TH:i:s.000-04:00", time() + 1800 ) );
     $event->setEnd( $dte );

     $att = array();
     foreach( $emails as $e )
     {
         $attendee = new \Google_Service_Calendar_EventAttendee();
         $attendee->setEmail( $e );
         $att[] = $attendee;
     }

     $event->setAttendees( $att );
     $x = $calendar->events->insert( "primary", $event, array( 'sendNotifications' => true ) );
            return new JsonModel( array( 'success' => true ) );
    }
    catch( \Exception $x )
    {
        return new JsonModel( array( 'success' => false, 'message' => $x->getMessage() ) );
    }
}
On the front end, the AJAX call looked like this. In a nutshell, if it sees oauth in the json return, it triggers the Google callback
$.getJSON( '/sales/prospect/case-study', d, function( j ){
    if(j.oauth)
    {
        var popup = window.open(j.url, '_blank', 'width=500px,height=650px' );
        noty({
            layout: 'bottom',
            type: 'information',
            text: "You need to give Central access to your Google Calendar, please authorize Central and try again.",
            timeout: 10000
        });
    }
    else
    {
        if(j.success)
        {
            $("#act_case").modal('hide');
            showSuccess( "Case study successfully scheduled, nice work." );
        }
        else
        {
            showError(j.message);
        }
    }
}).always( function(){
    btn.trigger('ladda-stop');
});
What this does, is open up a Google authorization dialog. The end user then selects their Google account, authorizes your app, and is driven to your callback URI. Here's the code to handle the callback. The official Google PHP docs are missing the parameter to 'authenticate'
public function callbackAction()
{
$client = $this->getServiceLocator()->get('GoogleClient');
if( $code = $this->params()->fromQuery('code') )
{
$client->authenticate( $code );
$_SESSION['google_access_token'] = $client->getAccessToken();
}
$vm = new ViewModel();
$vm->setTemplate('application/index/blank_raw' );
$vm->setVariable( 'output', "" );
$vm->setTerminal( true );
return $vm;
}
Hope this helps! Drop me a note if I missed a critical detail that could have saved you time! Me, I wish I'd found this article yesterday! ;)
Localizing your Twig-using Zend Framework 2 Application with PoEdit
Quickstart to getting translations into your ZF2 applications using Poedit, and TWIG. This can be a real PITA, and has a few gotchas since you're using a few bits of open source software. It can be put together to work though, here's how.
This may seem like yet-another-PoEdit post, but, I write it because I hadn't found any that brought Zend Framework 2 and Twig together in a stepwise fashion that made sense to someone who's just looking to integrate translations into their ZF2 apps. If you're doing it under the gun, and fire up POEdit quickly because you "usually do" figure things out, you're likely to !%!@#^@#$@… [and I did for awhile too, bug in Poedit that's enough to make you double up on your Lisinopril].
Getting Ready
- Download PoEdit if you haven't already.
- Require Twig-Gettext-Extractor by adding "umpirsky/twig-gettext-extractor": "dev-master" to your composer.json file (and run your composer update command thereafter)
- Install gettext on your system. If command 'xgettext' doesn't work from your Terminal, you need to install it (edit: added these instructions at the end if you need 'em).
EDIT: I uncovered a few minor gremlins in the umpirsky extractor, I forked it and tweaked ever so slightly to make your life happy again.
Configuring PoEdit
Download PoEdit. I'm doing this from a Mac, so your mileage may vary a tiny bit. If you are a Mac user like me, using version 1.6, there's a pesky bug that makes TMP files vanish. You can get around this by launching Poedit from the terminal with:
WXTRACE=poedit,poedit.tmp,poedit.execute /Applications/Poedit.app/Contents/MacOS/Poedit --verbose --keep-temp-files
- Go to PoEdit > Preferences > Personalize. Fill in your name and email.
- Still in this Preferences panel, go to Parsers
- PHP should already be in there, select it and click Edit.
- In the panel that appears, change your list of extensions to *.php, *.phtml
- Click OK to close
- Now to add a new parser for Twig templates, click New
- Configure as such:
| Language | Twig |
| List of extensions | *.twig |
| Parser command | /path/to/your/project/vendor/bin/twig-gettext-extractor --sort-output --force-po -o %o %C %K -L PHP --files %F |
| An item in keywords list | -k%k |
| An item in input files list | %f |
| Source code charset | --from-code=%c |
- Click OK
- Click OK again, that should close the preferences dialog.
In debugging, I symlinked twig-gettext-extractor into /usr/local/bin. Simplifies the whole affair for the configuration of separate catalogs. If you do this, you can simplify the parser command considerably.
Creating a Catalog
- Go to File > New Catalog -- this opens a new settings panel
- Fill out the Translations Properties panel completely* , setting Charset and Source Code Charset to UTF-8 (this is likely right, tweak if need be). * you can ignore plural forms for now.
- Head over to the Paths tab
- Put a dot in Base Path
- In the Paths box on the bottom of this tab, use the GUI (throwback to Windows 95 here) to add your full folder paths (it's the only way I could get it to work, Base Path seems to break things for me)
- Click on the Keywords tab, and set it to this list:

Sources keywords list
- Click OK
Update the Catalog
When you click OK, it should parse through and update the catalog. Note: I ran into a strange bug with version 1.5.7 on OSX where it wouldn't parse unless I started the application from the command line - it's the line I noted above. Tinker with the UI and put your strings in. I had my en_US.po file saved in my module's language folder, you should too. When you save your "catalog", it'll crunch down a .po and a .mo. Now you just need to tell your ZF2 app to use them.
Module Configuration
I've read a few different ways of doing this online, I settled on this one and it works. In your module.config.php, make sure you have this config array in place:
module.config.php
    'translator' => array(
        'locale' => 'en_US',
        'translation_file_patterns' => array(
            array(
                'type' => 'gettext',
                'base_dir' => __DIR__ . '/../language',
                'pattern' => '%s.mo',
            ),
        ),
    ),
This tells your module how to behave: what type of translator to use, and where to find the gettext .mo file.
Then, you need to set the translator up. This is done in your Module.php inside of the onBootstrap block. In my case, I have a series of stacked libraries that each have their own translator setups, and have only changed the Module.php for my core "Application" module.
Module.php::onBootstrap
$translator = $e->getApplication()->getServiceManager()->get('translator');
$translator->setLocale( ( isset( $_COOKIE['locale'] ) ? $_COOKIE['locale'] : 'en_US' ) )
    ->setFallbackLocale( 'en_US' );
I use cookies to switch languages (via URL that sets cookies), so I've set it up to use the locale cookie plainly, with en_US as the basic locale (this is the name of your catalog btw).
Puttin' It All Together
You can use these translations from anywhere! Controllers, with:
$translator = $this->getServiceLocator()->get('translator');
$translator->translate( "Some String In Your Catalog" );
In discrete objects, purists in the crowd will argue that you should be using DI to pass the translator into the objects that need it, don't necessarily rely on the availability of the service locator. I think the availability of the SL is a hot topic with ZF3.
Most important, is its use in templates. Great examples here http://twig.sensiolabs.org/doc/extensions/i18n.html
Compiling Gettext
If you're on Windows, LMGTFY.
Homebrew has a convenient brew install gettext
Lastly, it's pretty painless to handbomb-in on most awesome OSes:
- Download Gettext from http://www.gnu.org/software/gettext/
- Extract
- ./configure
- sudo make && make install
Done like dinner.
Related Reading
- http://samminds.com/2012/09/create-po-language-files-using-poedit/